English

How to Remove a Toilet Seat (in Less Than 2 Minutes)
February 24, 2025
Post Views: 283


Jabra Sanitary is a sanitaryware supplier offering toilets, sinks, faucets, bathtubs, etc., at competitive prices. If you're a distributor, wholesaler, or project contractor, get a quote today!
 $23.9 Limited-time Offer
- Consignment Policy
- 20 Years of Experience
Removing a toilet seat might sound tricky, but with the right tools and guidance, it's surprisingly simple and quick. Whether you're upgrading to a more modern toilet seat or need to clean those hard-to-reach spots, knowing how to remove and replace a toilet seat can save you time and money.
In this step-by-step guide, we'll show you how to remove a toilet seat in less than two minutes. We'll also walk you through some common challenges, provide tips for tricky situations, and explain how to install a new toilet seat with ease.
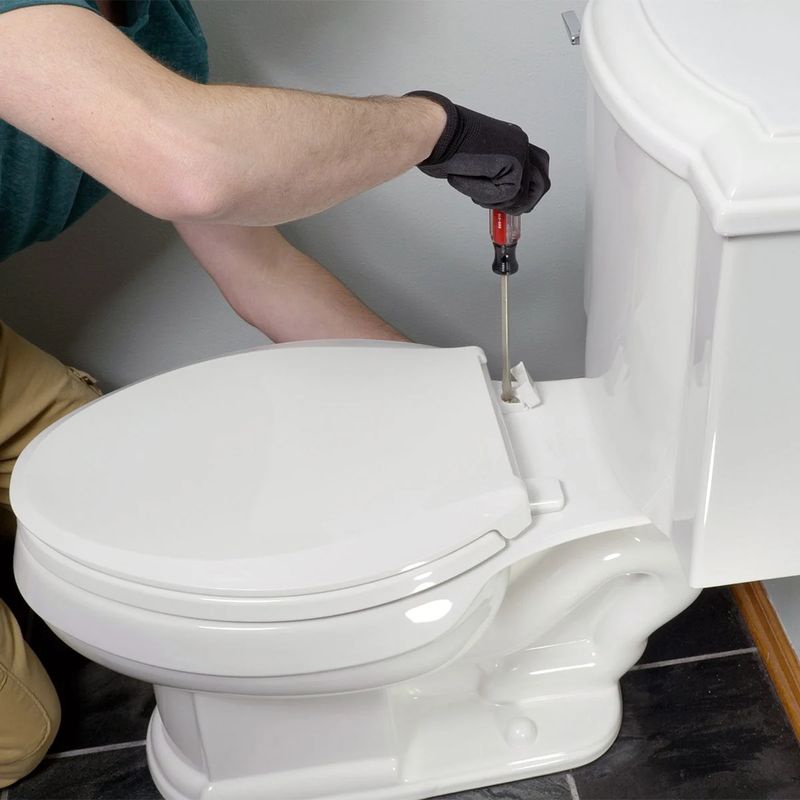
Table of Contents
Tools Required for the Toilet Seat Removal
Step-by-Step Guide to Removing a Toilet Seat
Tips for Difficult Bolts
How to Install a New Toilet Seat
Troubleshooting Common Issues
Toilet Seat Size Guide
DIY vs. Hiring a Pro
FAQs
Conclusion
Tools Required for the Toilet Seat Removal
Before we start, let's make sure we have everything we need. Having the right tools handy will make the process of changing a toilet seat quicker and smoother.
Here's a list of tools you'll need to remove an old toilet seat:
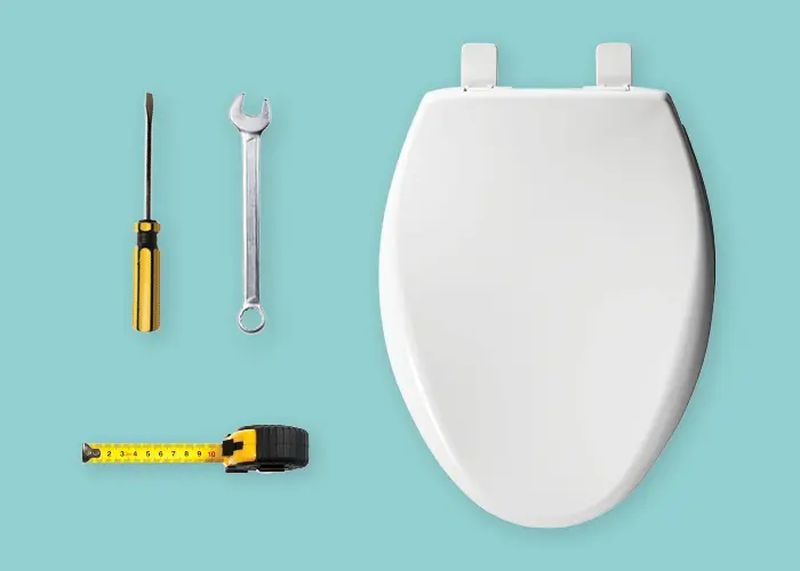
Essential Tools
- Adjustable Wrench – Loosen or tighten bolts.
- Flathead Screwdriver – Useful for prying open bracket covers or unscrewing bolts.
- Pliers – Helpful for gripping and twisting stuck bolts.
- Utility Knife – In case the bolts are corroded and need cutting.
Optional Tools (for tough situations)
- WD-40 or Penetrating Oil – For loosening rusty or stuck bolts.
- Mini Hacksaw – If the bolts are too damaged to unscrew.
- Cleaning Supplies – A soft cloth, disinfectant spray, and gloves for cleaning the area after removal.
Step-by-Step Guide to Removing a Toilet Seat
Let's get started with the actual removal of a toilet seat process. Follow these steps carefully, and you'll get your toilet seat off in less than two minutes! Here is a step-by-step guide:
1. Prep to Remove a Toilet Seat
- Clear the area around the toilet. Remove any items that may obstruct your movement.
- Wear gloves. This will protect your hands and keep things hygienic.
- Inspect the toilet seat. Check for mounting bolts or caps to identify how the seat is secured.
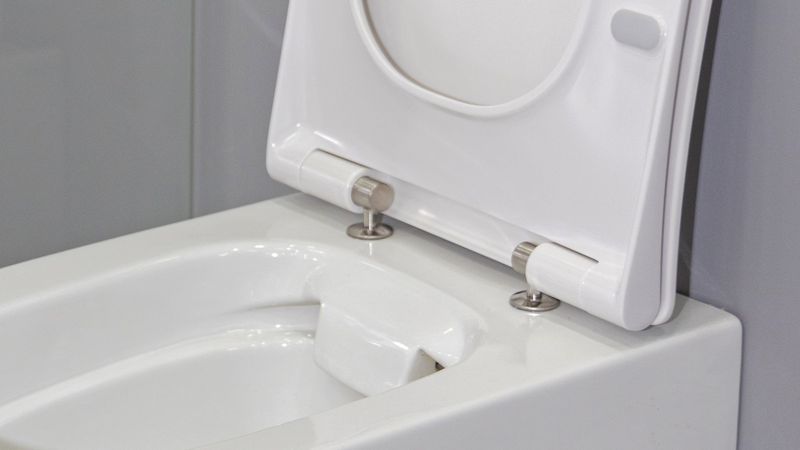
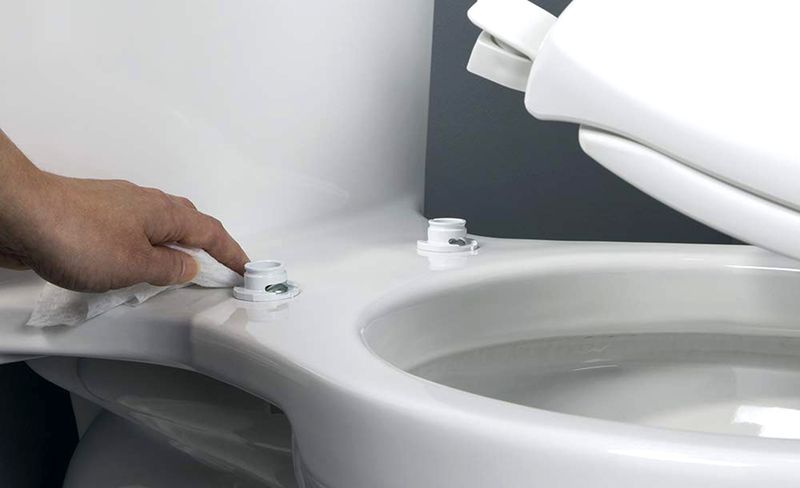
2. Flip Up the Bracket Covers
- Locate the bracket covers at the back of the toilet seat where it connects to the bowl.
- Use your fingers or a flathead screwdriver to gently pop open the covers. This will expose the bolts underneath.
3. Unscrew the Brackets
- Use an adjustable wrench or pliers to hold the nut underneath the bowl.
- With your other hand, use a screwdriver to remove toilet seat bolts from the top.
- Turn the bolt counterclockwise to loosen it. Be patient, as older bolts may require some extra effort. Note: If bolts are heavily rusted, refer to the "Tips for Difficult Bolts" section for advanced techniques (e.g., penetrating oil, heat application)

4. Cut the Mounting Bolts (If Necessary)
- If the bolts are rusty, corroded, or won't budge, use a mini hacksaw or a utility knife to carefully cut through the bolts.
- Be cautious not to damage the porcelain surface of the toilet bowl.
5. Remove the Toilet Seat and Clean the Area
- Once the bolts are loosened or cut, simply lift the toilet seat off the bowl.
- Use disinfectant spray and a soft cloth to thoroughly clean the area around the mounting holes. This ensures a fresh start for your new toilet seat.
Tips for Difficult Bolts
Sometimes, changing a toilet seat isn't as straightforward as we'd like it to be. Rusty or stuck bolts can make the process to remove toilet seat bolts frustrating. Don't worry—here are some practical tips to deal with those tricky situations:
1. Use Penetrating Oil
- Apply WD-40 or a penetrating oil to the bolts and nuts. Let it sit for 5-10 minutes to loosen the rust or debris.
- After waiting, try unscrewing the bolts again with a wrench or pliers.
2. Heat the Bolts
- If a penetrating oil doesn't work, carefully apply heat to the bolts using a hairdryer. The heat can expand the metal and make it easier to loosen.
- Be cautious and avoid using open flames or excessive heat near the toilet bowl.
3. Cut the Bolts
- If the bolts are too damaged or stuck, use a mini hacksaw or rotary cutting tool to cut through them.
- Work slowly and carefully to avoid scratching or damaging the porcelain.
4. Tap the Bolts with a Hammer
- Gently tap the bolts with a small hammer to loosen any rust or debris holding them in place. This can help break the grip of stuck bolts.
5. Call for Backup
- If all else fails, consider reaching out to a friend or a professional plumber to loosen toilet seat bolts for assistance. Sometimes, an extra set of hands can make all the difference.
By using these tips, you'll be able to handle even the most stubborn bolts with ease. Once you loosen toilet seat bolts, the rest of the fixing toilet seat process is smooth sailing!
How to Install a New Toilet Seat
Once you've uninstalled the old toilet seat and cleaned the area, it's time to install the new one. Follow these simple steps to get your toilet looking fresh and functional quickly!
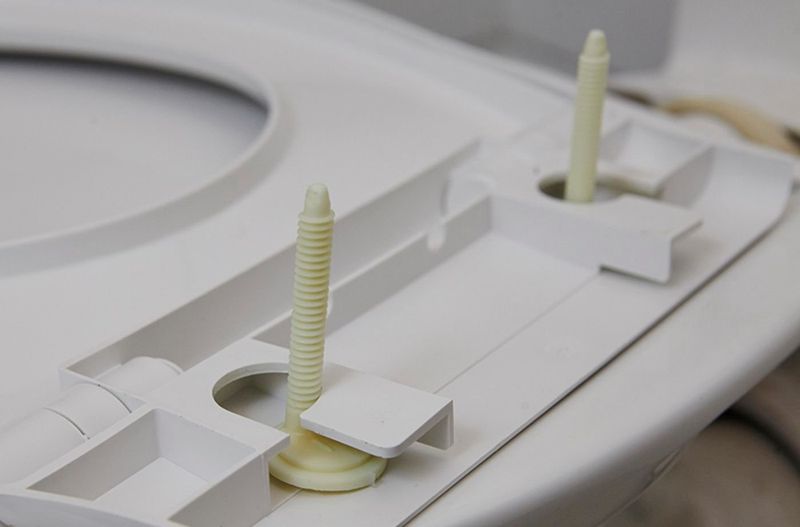
1. Position the New Seat
- Place the new toilet seat on the bowl, ensuring the hinges align perfectly with the mounting holes.
- Adjust the seat so it sits evenly and feels comfortable when lowered.
2. Secure the Bolts
- Insert the mounting bolts through the holes in the toilet bowl and the hinges of the seat.
- From underneath the bowl, attach the nuts to the bolts and hand-tighten them.
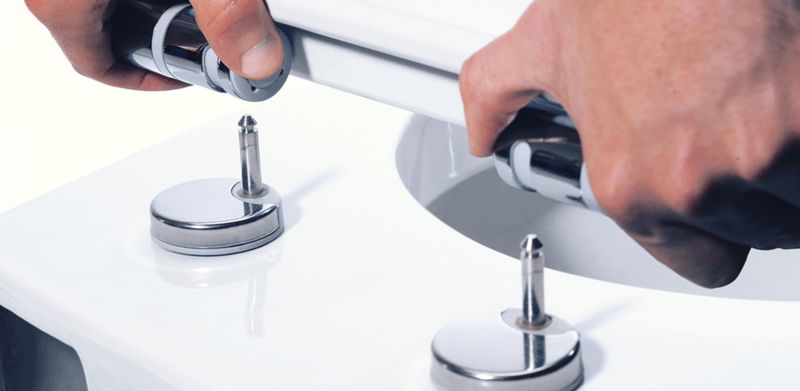
3. Tighten with Tools
- Use a wrench or pliers to tighten the nuts securely, but be careful not to overtighten. Over-tightening could damage the toilet bowl or the hinges.
- Some toilet seats come with a quick-release mechanism or specialty bolts. Be sure to follow the manufacturer's instructions if applicable.
4. Make Final Adjustments
- Lower the seat and lid to ensure it's aligned properly and doesn't wobble.
- If needed, make small adjustments by loosen toilet seat bolts slightly, repositioning the seat, and then re-tightening. <If you need a bidet, also learn how to install a bidet here>
 Ads
Ads
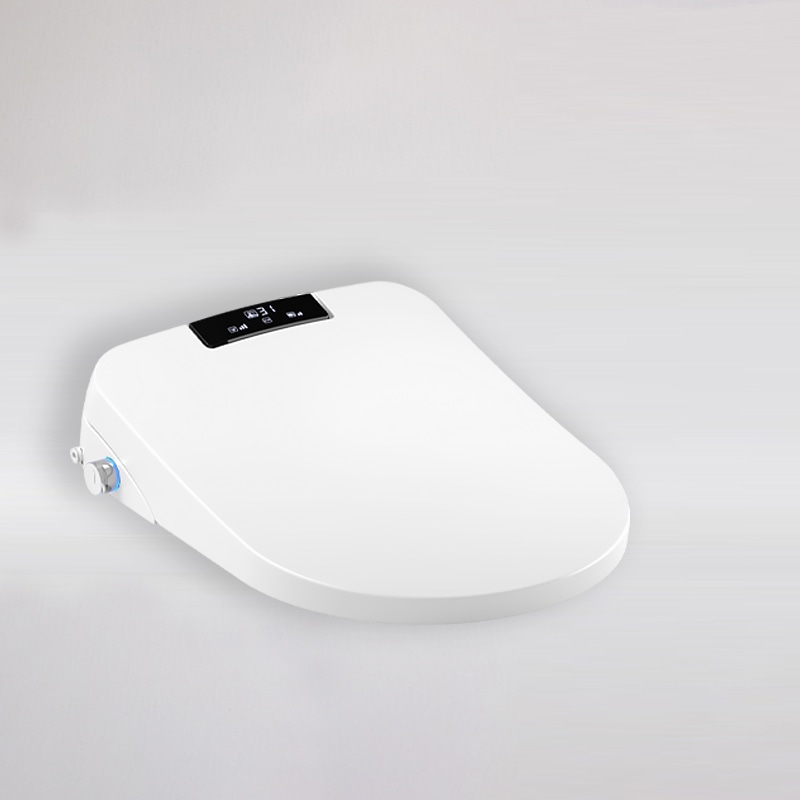
Japanese Toilet Bidet With Dryer
We offer toilet bowls and urinals with hundreds of styles for your projects. Find your perfect bathroom solution here.
Troubleshooting Common Issues
Even after successfully removing and installing a toilet lid, you might encounter some minor issues. Here's how to fix the most common problems:
Loose Seat Problems
Issue: The toilet seat feels loose or wobbly after installation.
Solution:
- Tighten the bolts using a wrench or screwdriver.
- If the bolts are stripped or damaged, replace them with new ones.
- For extra stability, use rubber washers between the bolts and the toilet bowl.
Alignment Difficulties
Issue: The toilet seat doesn't sit evenly or looks misaligned.
Solution:
- Loosen the bolts slightly, reposition the seat, and retighten the bolts until the alignment is perfect.
- Some toilet seats come with adjustable hinges—utilize these for precise positioning.
By addressing these common issues when removing your a toilet lid, your toilet seat will remain secure, aligned, and functional for the long term!
Toilet Seat Size Guide
Choosing the right size toilet seat is essential for comfort and functionality. Not all toilet seats are universal.
So it's important to measure your toilet seat and find a seat that fits perfectly. Here's how to determine the correct size:
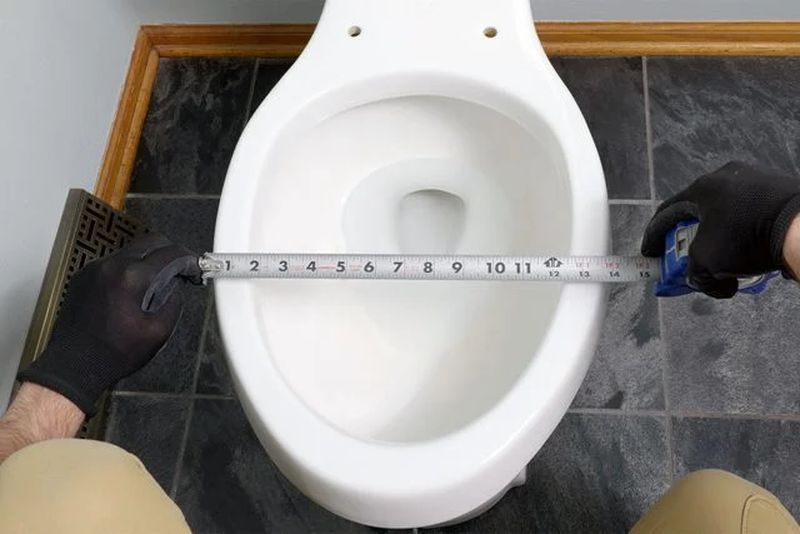
1. Measure the Toilet Bowl
- Length: Measure from the center of the mounting holes at the back of the bowl to the front edge of the toilet.
- Width: Measure the widest part of the toilet bowl.
- Mounting Hole Distance: Measure the distance between the two mounting holes at the back of the toilet bowl.
2. Standard Toilet Seat Sizes
Most toilet seats fall into two main categories, based on the shape and size of the toilet bowl:
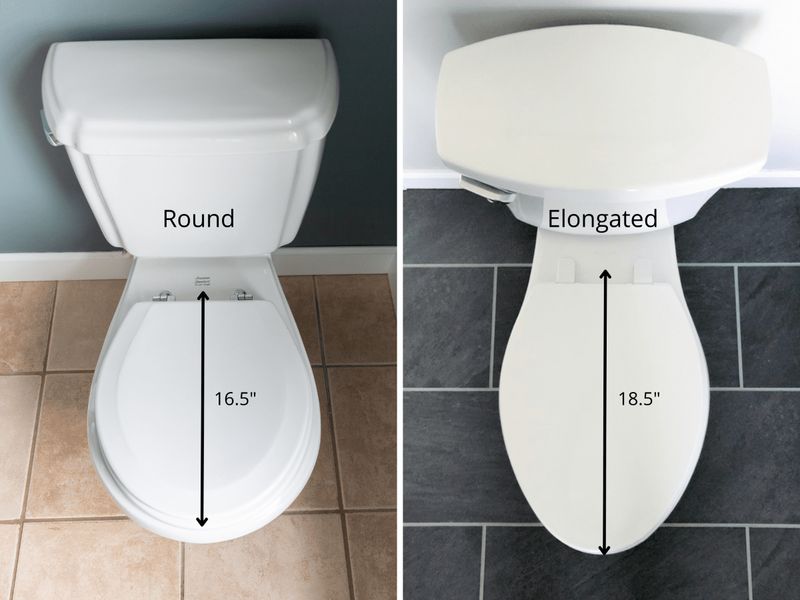
Round Toilet Seats
- Length: About 16.5 inches (42 cm) from the mounting holes to the front edge of the bowl.
- Width: Typically around 14 inches (35.5 cm) at the widest part.
- Best For: Compact bathrooms and smaller toilet setups.
Elongated Toilet Seats
- Length: Approximately 18.5 inches (47 cm) from the mounting holes to the front edge of the bowl.
- Width: Typically between 14 and 15 inches (35.5 to 38 cm) at the widest part.
- Best For: Users who prefer more comfort and ergonomic designs.
3. Check the Manufacturer's Guide
Many toilet manufacturers such as Jabra Sanitary provide specific seat recommendations for their models. If you're unsure, consult the user manual or visit the manufacturer's website for details.
4. Test for Compatibility
Before purchasing, double-check the product specifications to ensure the seat will fit your toilet bowl. Some modern seats may include adjustable fittings for greater flexibility.
A properly sized toilet seat not only improves comfort but also enhances the overall look of your bathroom!
DIY vs. Hiring a Pro
When it comes to the removal of toilet seat, you might be wondering whether you should do it yourself (DIY) or call in a professional. Let's weigh the pros and cons of both options to help you make an informed decision.
DIY: Do It Yourself
Pros:
- Cost Savings: DIY is significantly cheaper since you won't need to pay for labor.
- Quick and Convenient: With the right tools and guidance, removing or installing a toilet seat can even take less than two minutes.
- Learn a Useful Skill: Once you've done it, you'll have the confidence to tackle similar tasks in the future.
Cons:
- Tough Situations: If the bolts are stuck or the seat doesn't fit properly, you might face challenges that require extra effort or tools.
- Risk of Damage: If you're not careful, you could damage the toilet bowl or the new seat during installation.
When DIY Makes Sense:
- You already have basic tools like a wrench, screwdriver, or pliers.
- You enjoy hands-on projects and are confident following step-by-step guides.
- The seat installation is straightforward without complicated fittings or unusual hardware.
Hiring a Professional
Pros:
- Expertise: A professional plumber can handle any issues, including stuck bolts, misaligned seats, or unusual fittings.
- No Hassle: You won't have to worry about making mistakes or buying special tools.
- Guaranteed Results: Many professionals offer warranties or guarantees on their work.
Cons:
- Cost: Hiring a pro can be expensive, especially for a simple task like toilet seat replacement.
- Scheduling: You may need to wait for an appointment, which could delay the process.
When Hiring a Pro Makes Sense:
- The bolts are severely rusted or stuck, and you don't have the tools to cut or loosen them.
- The toilet seat requires a custom fit or advanced installation techniques.
- You want a perfect and hassle-free installation with no risk of damage.
In conclusion, if you're going to replace a toilet seat and have basic tools, go the DIY route—it's quick, easy, and cost-effective. However, for complex installations or stubborn bolts, hiring a professional to uninstall toilet seat might save you time and frustration.
FAQs
Here are answers to some of the most common questions about removing, installing, and replacing toilet seats:
Why can't I unscrew my toilet seat?
This is usually caused by rusted or corroded bolts. Try applying WD-40 or penetrating oil to loosen the bolts. If that doesn't work, you may need to use a mini hacksaw to cut through them carefully.
Are replacement toilet seats universal?
No, toilet seats are not universal. They come in two standard sizes: round and elongated. Be sure to measure your toilet bowl before purchasing a replacement to ensure a proper fit.
What is the life expectancy of a toilet seat?
The average toilet seat lasts 5-10 years, depending on the quality of the material and how frequently it's used. Regular cleaning and maintenance can extend its lifespan.
How do I know which toilet seat will fit my toilet?
Measure your toilet bowl's length, width, and mounting hole distance before purchasing. Check the product description of the seat to confirm it matches your measurements.
How often should I replace my toilet seat?
Toilet seats should typically be replaced every 5-7 years or sooner if they show signs of wear, cracks, or damage. For hygiene reasons, consider replacing the seat if it cannot be cleaned thoroughly.

Conclusion
Removing and replacing a toilet seat is a simple task that anyone can do with the right tools and guidance. By following our step-by-step instructions and troubleshooting tips, you can confidently complete the job in less than two minutes.
Whether you're dealing with stuck bolts, looking for the perfect fit, or deciding between DIY and hiring a professional, we've also got you covered.
If you're ready to upgrade your toilet seat or need professional assistance, don't hesitate to Jabra Sanitary, your reliable toilet factory. It offers reliable removal, replacement, and installation consultation services, providing expert guidance for a hassle-free experience.
More Reading


Request Free Quote Today!
Jabra Sanitary is a manufacturer of high-quality sanitary ware based on innovative technology. We are always ready to help with your building and infrastructure projects.
Please leave your contact details below, and we'll get back to you within 8 business hours to discuss your needs.
Stay Updated With Our Latest News & Products
© 2025 Jabra Sanitary Ware. All Rights Reserved.
Products
Contact Info
-
 sales@jabrasanitary.com
-
 +8618151961957
-
 +8618151961957
-
 No. 1, Zhenxing Road,
Chaoan District, Chaozhou City,
Guangdong Province, China